The current package supports Ubuntu in two configurations: a desktop client with UI and a continuously available Server. Choose the path that matches this machine.
Le paquet actuel prend en charge Ubuntu dans deux configurations : un client de bureau avec interface et un Server disponible en continu. Choisissez le mode correspondant à cette machine.
Das aktuelle Paket unterstützt Ubuntu in zwei Konfigurationen: als Desktop-Client mit Benutzeroberfläche und als dauerhaft erreichbarer Server. Wählen Sie den passenden Weg für diesen Rechner.
Текущий пакет поддерживает Ubuntu в двух конфигурациях: клиент с графическим интерфейсом и постоянно доступный Server. Выберите сценарий, соответствующий назначению этой машины.
Verify and unpack
Ubuntu 24.04 / 26.04 LTS · amd64 · desktop and server
The installer installs the dependencies, daemon, UI and services. After installation, log out of your user session and sign in again so the access-group membership takes effect.
Start IRVIO from the applications menu or run:
irvio
The daemon starts automatically when the UI opens. Then import the bootstrap, select a country and press CONNECT. You do not need to start the daemon manually.
Connecting also enables your node as an Exit Node: other participants can use your internet connection and reach the internet through your public IP address.
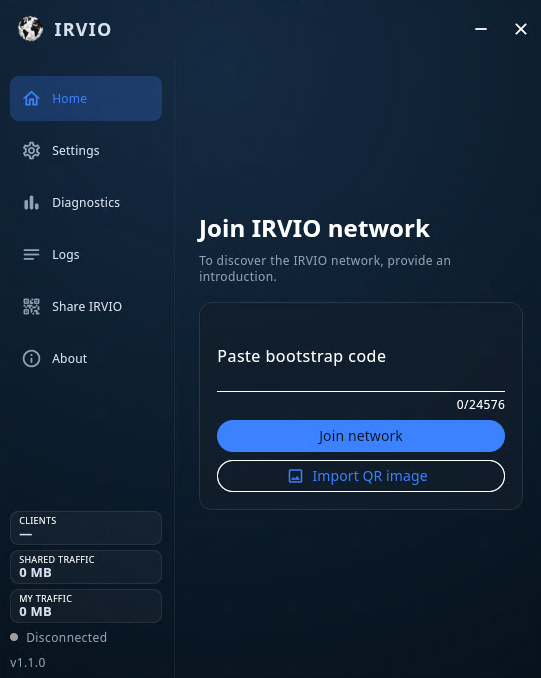
Step 1Paste a bootstrap code or import its QR image.
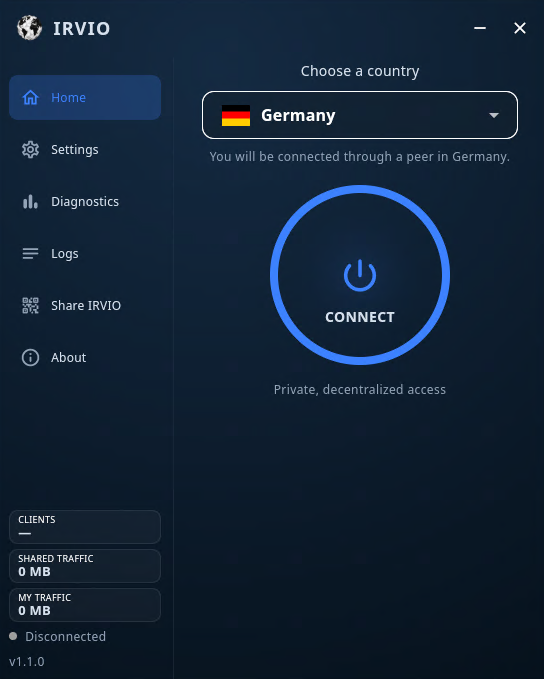
Step 2Wait until countries become available.
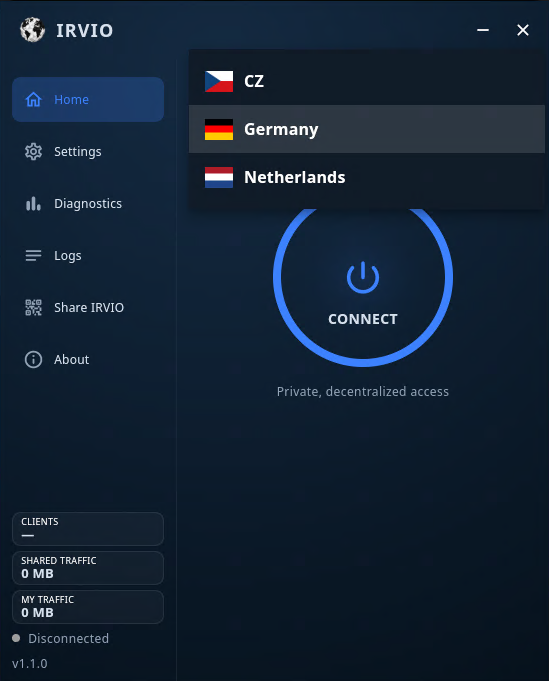
Step 3Select the country through which you want to connect.
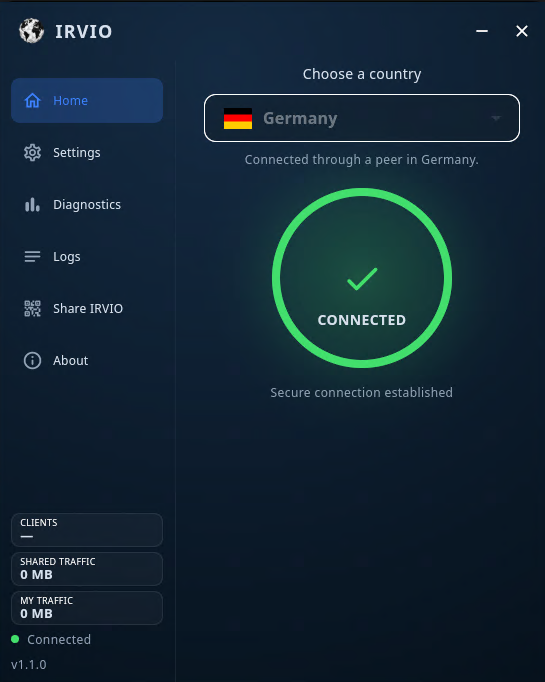
Step 4Press CONNECT and wait for CONNECTED.
Server without UI
sudo ./install.sh --role server --bootstrap 'irvio-bootstrap:v1:<FULL_BUNDLE>'
The installer installs the dependencies, configures and enables the service, starts the server and checks readiness. On success it prints:
IRVIO server: OK
If a problem occurs, the installer prints the reason and diagnostic commands.
Fixed external ports
TCP/4000 — bootstrap/libp2p.
UDP/3478 — STUN.
UDP/51820 — ICE/AWG.
The installer configures an active UFW firewall. If a firewall is enabled in the provider’s control panel, allow these ports there separately. The installer does not overwrite custom firewall rules.
These commands are intended for a new installation; the installer deliberately does not overwrite an existing manual installation.
Logs and diagnostics
The main IRVIO logs are stored in the systemd journal, not in a separate irvio.log file.
Connectez-vous à GitHub avec un compte ayant accès au dépôt privé Irviodotnet/Irvio. Sans accès, GitHub peut renvoyer 404.
Téléchargez les deux fichiers dans le même dossier. Exécutez ces commandes dans ce dossier et continuez uniquement si les deux vérifications réussissent.
sha256sum -c irvio-1.1.0-alpha.20261005.3-ubuntu-amd64.tar.gz.sha256 &&
tar -xzf irvio-1.1.0-alpha.20261005.3-ubuntu-amd64.tar.gz &&
cd irvio-1.1.0-alpha.20261005.3-ubuntu-amd64 &&
sha256sum --check --strict --quiet SHA256SUMS
L’installateur installe les dépendances, le daemon, l’interface et les services. Après l’installation, déconnectez-vous de votre session utilisateur puis reconnectez-vous afin d’appliquer l’appartenance au groupe d’accès.
Lancez IRVIO depuis le menu des applications ou exécutez :
irvio
Le daemon démarre automatiquement à l’ouverture de l’interface. Importez ensuite le bootstrap, choisissez un pays et appuyez sur CONNECT. Il n’est pas nécessaire de démarrer le daemon manuellement.
La connexion active également votre nœud comme Exit Node : d’autres participants peuvent utiliser votre connexion Internet et accéder à Internet depuis votre adresse IP publique.
Étape 1Collez le code bootstrap ou importez son QR code.
Étape 2Attendez que les pays soient disponibles.
Étape 3Choisissez le pays de sortie.
Étape 4Cliquez sur CONNECT et attendez CONNECTED.
Server sans interface
sudo ./install.sh --role server --bootstrap 'irvio-bootstrap:v1:<BUNDLE_COMPLET>'
L’installateur installe les dépendances, configure le service et son démarrage automatique, lance le serveur et vérifie qu’il est prêt. En cas de succès, il affiche :
IRVIO server: OK
En cas de problème, il affiche la cause et les commandes de diagnostic.
Ports externes fixes
TCP/4000 — bootstrap/libp2p.
UDP/3478 — STUN.
UDP/51820 — ICE/AWG.
L’installateur configure UFW s’il est actif. Si un pare-feu est activé dans le panneau du fournisseur, autorisez-y ces ports séparément. L’installateur ne remplace pas les règles de pare-feu personnalisées.
Ces commandes sont destinées à une nouvelle installation ; l’installateur n’écrase volontairement pas une installation manuelle existante.
Journaux et diagnostic
Les principaux journaux d’IRVIO se trouvent dans le journal systemd, et non dans un fichier irvio.log distinct.
Il s’agit des journaux du daemon, et non d’un journal distinct de l’interface. Vérifiez leur contenu avant tout partage public : ils peuvent contenir des PeerID et des adresses réseau.
Windows · Prochainement
Les instructions d’installation et de premier démarrage seront ajoutées avec la première version Windows.
Prüfen und entpacken
Ubuntu 24.04 / 26.04 LTS · amd64 · Desktop und Server
Melden Sie sich bei GitHub mit einem Konto an, das Zugriff auf das private Repository Irviodotnet/Irvio hat. Ohne Zugriff kann GitHub 404 melden.
Laden Sie beide Dateien in dasselbe Verzeichnis herunter. Führen Sie dort diese Befehle aus und fahren Sie nur fort, wenn beide Prüfungen erfolgreich sind.
sha256sum -c irvio-1.1.0-alpha.20261005.3-ubuntu-amd64.tar.gz.sha256 &&
tar -xzf irvio-1.1.0-alpha.20261005.3-ubuntu-amd64.tar.gz &&
cd irvio-1.1.0-alpha.20261005.3-ubuntu-amd64 &&
sha256sum --check --strict --quiet SHA256SUMS
Das Installationsprogramm installiert Abhängigkeiten, Daemon, Benutzeroberfläche und Dienste. Melden Sie sich nach der Installation von Ihrer Benutzersitzung ab und erneut an, damit die Mitgliedschaft in der Zugriffsgruppe wirksam wird.
Starten Sie IRVIO über das Anwendungsmenü oder mit:
irvio
Der Daemon startet automatisch beim Öffnen der Benutzeroberfläche. Danach: Bootstrap importieren, Land wählen und CONNECT drücken. Der Daemon muss nicht manuell gestartet werden.
Die Verbindung aktiviert Ihren Knoten zugleich als Exit Node: Andere Teilnehmer können Ihre Internetverbindung nutzen und über Ihre öffentliche IP-Adresse ins Internet gelangen.
Schritt 1Bootstrap-Code einfügen oder QR-Bild importieren.
Schritt 2Warten, bis Länder verfügbar sind.
Schritt 3Gewünschtes Ausgangsland auswählen.
Schritt 4CONNECT drücken und auf CONNECTED warten.
Server ohne Benutzeroberfläche
sudo ./install.sh --role server --bootstrap 'irvio-bootstrap:v1:<VOLLSTÄNDIGES_BUNDLE>'
Das Installationsprogramm installiert die Abhängigkeiten, richtet den Dienst und dessen automatischen Start ein, startet den Server und prüft die Betriebsbereitschaft. Bei Erfolg erscheint:
IRVIO server: OK
Bei Problemen werden die Ursache und Diagnosebefehle ausgegeben.
Feste externe Ports
TCP/4000 — Bootstrap/libp2p.
UDP/3478 — STUN.
UDP/51820 — ICE/AWG.
Das Installationsprogramm konfiguriert eine aktive UFW-Firewall. Ist im Verwaltungsbereich des Providers eine Firewall aktiviert, müssen diese Ports dort separat freigegeben werden. Benutzerdefinierte Firewall-Regeln werden nicht überschrieben.
Diese Befehle sind für eine Neuinstallation bestimmt; eine bestehende manuelle Installation wird absichtlich nicht überschrieben.
Protokolle und Diagnose
Die wichtigsten IRVIO-Protokolle befinden sich im systemd-Journal und nicht in einer separaten Datei irvio.log.
Dies sind Daemon-Protokolle, kein separates Protokoll der Benutzeroberfläche. Prüfen Sie den Inhalt vor einer öffentlichen Weitergabe: Er kann PeerIDs und Netzwerkadressen enthalten.
Windows · Demnächst
Installations- und Ersteinrichtungsanweisungen werden mit der ersten Windows-Version ergänzt.
Установщик поставит зависимости, daemon, UI и службы. После установки выйдите из пользовательского сеанса и войдите снова для применения группы доступа.
Запуск через меню приложений IRVIO или:
irvio
Daemon запустится автоматически при открытии UI. Далее: импорт bootstrap → выбор страны → CONNECT. Вручную запускать daemon не нужно.
Подключение также включает ваш узел как Exit Node: другие участники могут использовать ваше интернет-соединение и выходить через ваш публичный IP-адрес.
Шаг 1Вставьте bootstrap-код или импортируйте QR-изображение.
Шаг 2Дождитесь появления доступных стран.
Шаг 3Выберите страну выхода.
Шаг 4Нажмите CONNECT и дождитесь CONNECTED.
Сервер без UI
sudo ./install.sh --role server --bootstrap 'irvio-bootstrap:v1:<ПОЛНЫЙ_BUNDLE>'
Установщик сам установит зависимости, настроит службу и её автозапуск, запустит сервер и проверит готовность. При успехе напишет:
IRVIO server: OK
При проблемах установщик выведет причину и команды диагностики.
Фиксированные внешние порты
TCP/4000 — bootstrap/libp2p.
UDP/3478 — STUN.
UDP/51820 — ICE/AWG.
Активный UFW настраивается установщиком. Firewall в панели провайдера, если он включён, нужно разрешить отдельно. Нестандартные правила firewall установщик не перезаписывает.
Эти команды предназначены для новой установки; существующую ручную установку он намеренно не затирает.
Логи и диагностика
Основные логи IRVIO находятся в systemd journal, а не в отдельном irvio.log.